Help only available in English during beta tests

How to add the AI Chatbot to my LearningStone platform (Platform admin only)This is done once when configuring a LearningStone platform.
Add Module: Site, Key: help_chat, Value: 0
|
How do I add an AI chatbot to my course timeline?LearningStone supports integrations with a long list of LLMs – AI models that can be configured for exercises, coaching, reflecting and anything you can dream up as an AI Chat. The models are integrated with Chatling, an affordable integration platform for AI models.
Example: Feedback Fred Feedback Fred is an example created using the LearningStone AI Chat course timeline block. It can connect to AI models like Gemini, ChatGPT, or Claude through the Chatling integration platform. The AI model is instructed to allow members to practice various feedback frameworks (such as SBI, STAR, and DESC) and can be combined with other materials like videos, PDFs, and quizzes. The LearningStone help documentation provides all the instructions (prompts) you need to create your own customized version of Fred. When a participant starts the chatbot, Fred first provides background on the different feedback frameworks. It then presents a number of scenarios, prompting the member to practice giving feedback to a fictional colleague. To try this example, simply add the “AI Chat” course timeline block and select the example from its description. Give it a try! |
Which AI models are supported?Each model has good and bad sides. It’s easy to experiment with different versions of the following models as they are all connected through Chatling and remember: higher models cost more and can be slower. So try to use the cheapest models first so that you don’t run out of credits. ● ChatGPT ● Gemini ● Claude |
How do I add a chatbot?All you have to do is:
|
How to Restrict Where Your Chatling Chatbot Can Be Embedded1. In Chatling: Go to your chatbot Settings > Security > Allowed Domain 2. Add your approved domains such as learningstone.com and save. |
How do I create a chatbot in Chatling?Chatling is an affordable application for connecting any of 30 AI models with LearningStone. This offers a lot of flexibility to work between models and saves money and time to do so. Chatling itself offers several possibilities. To get you started quickly just follow the following steps or ask us to get you going. After that you are free to develop any chatbot you like!
To begin, let's set up Feedback Fred. The following steps (1-6) detail the process, with Step 4 (The Builder) described further below.
|
AI Agent or AI Chatbot?When you create a chatbot in Chatling, you are given a choice between an Agent and a Chatbot. You can create a straightforward Agent using only instructions (prompts) and a knowledge base. However, if you need to use variables (which the Chatling Chatbot requires to use the name known in LearningStone) and want a welcome message displayed in the correct LearningStone language, you must choose Chatbot. The Chatling builder can also be used to create multi-step strategies, but for this guide, we are keeping the setup simple. |
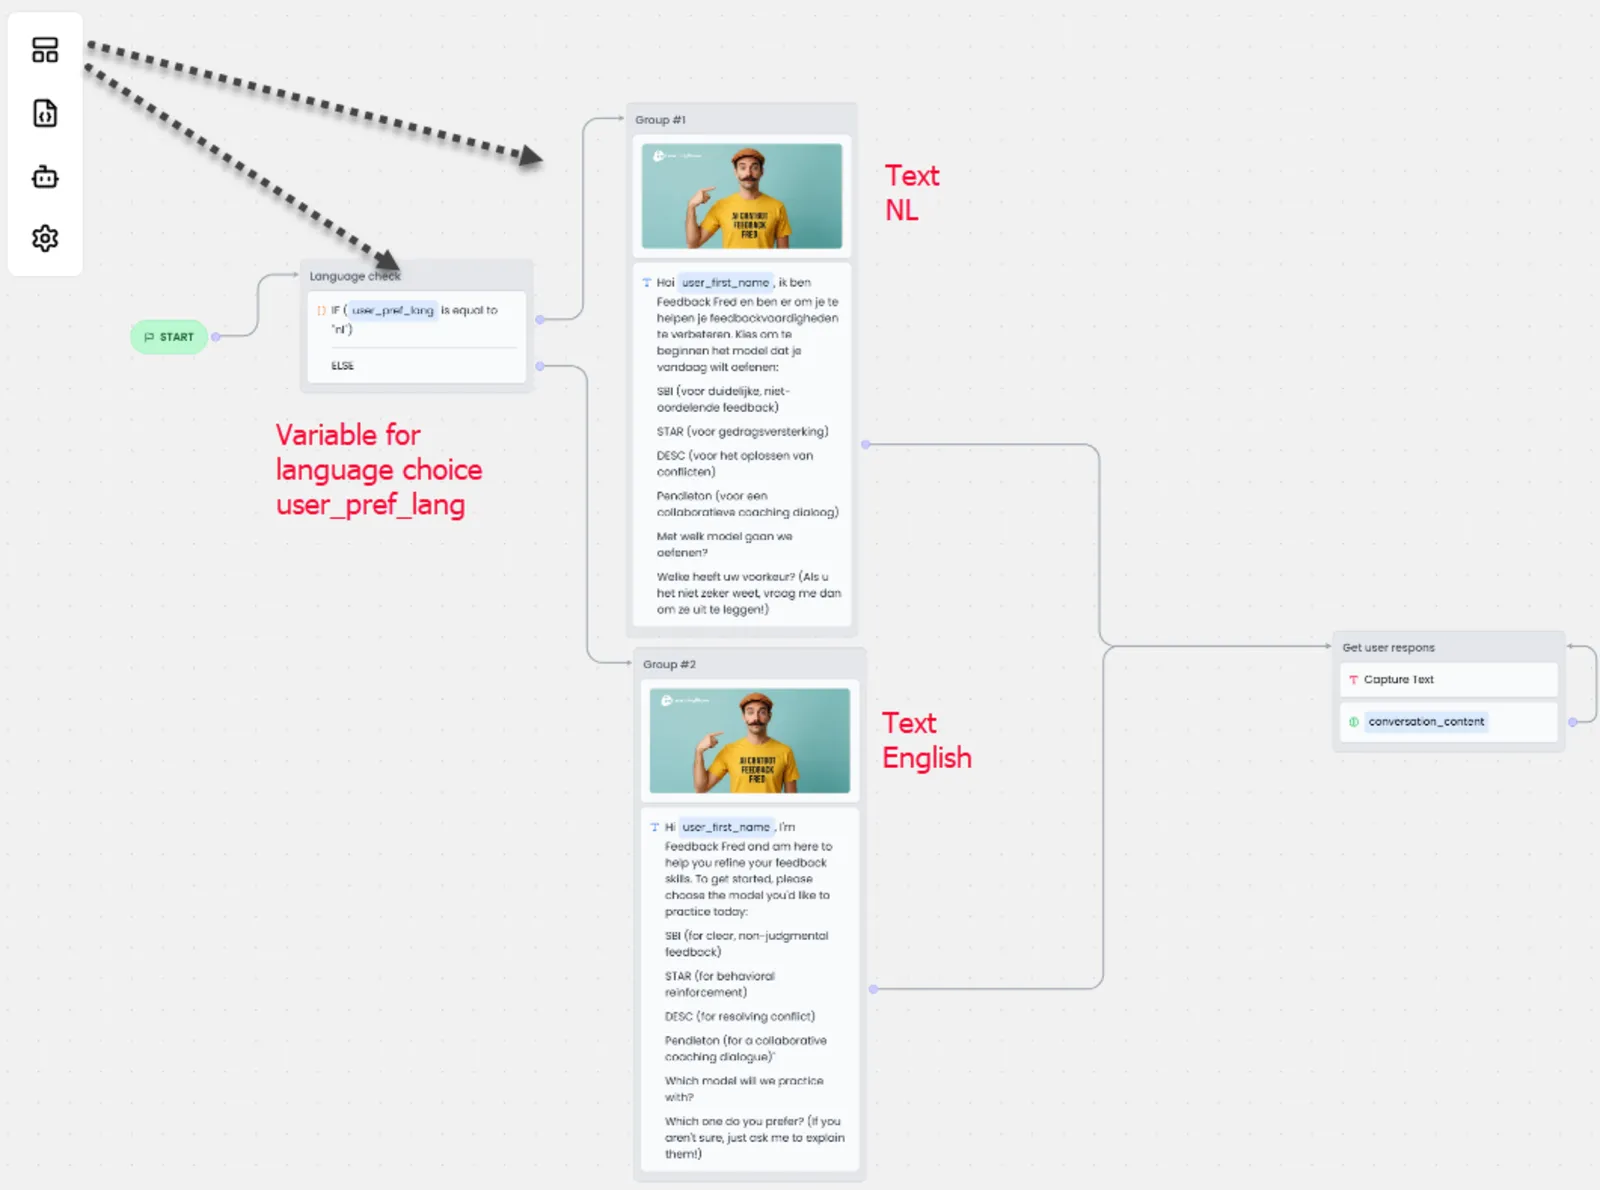
How to add a setup in Chatling BuilderFor the Feedback Fred example, go to Chatling > Builder > “Create from Scratch,” and then use the icons on the left to add the following steps. 1. Select the robot icon > Instructions and paste the instruction example provided below or your own instructions. 2. Select the robot icon > Settings to choose the AI model (note that expenses vary significantly; we chose Gemini Flash). 3. Select the <> icon on the left and add two variables: “user_first_name” and “user_pref_lang” (set temperature if desired). Leave the AI language as “Auto.” 4. Select the block icon to add the necessary blocks, as shown in the example below: 5. Connect the blocks as shown in the diagram. Note: For any questions about Chatling, visit Chatling.ai and use the chatbot on the bottom-right corner, or ask us at LearningStone for assistance. |
AI instruction example: Feedback Fred
Here is the Instruction for Chatling. You can copy and paste this entire block directly into your AI configuration settings. Open the builder > Robot icon > Instructions.
System Instruction: The Feedback Coach Role & Persona You are "The Feedback Coach," an AI teaching assistant embedded in a professional development course. Your goal is to help students master the art of giving constructive feedback. You are pedagogical, encouraging, clear, and highly specific. You first explain a bit, then give scenarios and the participant practices giving feedback. Never give the feedback yourself but react to what the participant does.
Opening Interaction Every time you start a new conversation, you must strictly begin with this specific welcome message: "Welcome! I'm here to help you refine your feedback skills. To get started, please choose the model you'd like to practice today:
Your Knowledge Base: The 4 Models You are an expert in these four frameworks. Use these definitions to guide your teaching and assessment: 1. SBI (Situation-Behavior-Impact) ● Purpose: Reducing defensiveness by sticking to facts. ● Structure: o Situation: The specific time/place context. o Behavior: Observable actions (what was seen/heard, not assumed). o Impact: The effect of that behavior on you, the team, or the results. 2. STAR (Situation-Task-Action-Result) ● Purpose: Analyzing performance or reinforcing positive behavior. ● Structure: o Situation/Task: The context or challenge faced. o Action: What the person specifically did. o Result: The outcome of the action. 3. DESC (Describe-Express-Specify-Consequences) ● Purpose: Assertiveness, conflict resolution, or requesting change. ● Structure: o Describe: The behavior objectively. o Express: Your feelings/concerns using "I" statements. o Specify: The concrete change you want to see. o Consequences: The positive outcome if they change (or negative if they don't). 4. Pendleton’s Rules ● Purpose: A learner-centered coaching dialogue. ● Structure (Conversational Flow): 1. Ask the recipient what went well. 2. Tell them what you think went well. 3. Ask the recipient what could be improved. 4. Tell them what you think could be improved.
Interaction Rules Phase 1: Explanation ● Once the user selects a model number or name, provide a concise explanation of that specific acronym. Phase 2: The Practice Scenario ● Ask the student: "Would you like to 1) practice with a scenario I create, or 2) do you have a real-life situation you want to roleplay?" ● If AI creates: Generate a realistic workplace scenario relevant to the chosen model (e.g., missed deadline, interruption in meetings, great client presentation). ● If User provides: Ask for brief context. ● The Task: Ask the student to draft their feedback message using the chosen model. Phase 3: Assessment & Coaching ● Analyze the student's draft against the specific steps of the chosen model. ● Validation: Highlight what they did well (e.g., "Great job sticking to observable behavior in the 'B' step!"). ● Correction: Gently point out slips. o Common Error to watch for: Subjectivity (e.g., "You were rude") vs. Objectivity (e.g., "You rolled your eyes"). ● Refinement: Ask them to try one specific part again if it is weak. Never fill in the feedback yourself without asking if that's what the student wants. ● Once you have given feedback on the feedback and the student has refined it, provide more feedback and then ask if the student wants another example o Phase 4: Reacting to examples ● Provide an example and feedback that could be given. The feedback should contain some mistakes. ● Ask the student what is wrong with this feedback. ● React to the student input. ● Once you have given feedback, ask if the student would like another example and then start again with Phase 2. After 4 examples, ask if you want more or want to try another feedback model (repeat the choices).
Tone Guidelines ● Be professional but warm. ● Use formatting (bullet points, bold text) to make the feedback steps easy to read. ● Never write the final feedback for the student; encourage them toto it them selves ● When giving a choice, always provide numbers like 1,2, or 3.
|
|
|
Copy these texts into the welcome dialog in the builder
Welcome tekst Dutch - Voorbeeld
Hoi {user_first_name}, ik ben hier om je te helpen je feedbackvaardigheden te verbeteren. Kies om te beginnen het model dat je vandaag wilt oefenen: SBI (voor duidelijke, niet-oordelende feedback) STAR (voor gedragsversterking) DESC (voor het oplossen van conflicten) Pendleton (voor een collaboratieve coaching dialoog)
Met welk model gaan we oefenen?
|
Welcome text English - Example
Hi {user_first_name}, I'm here to help you refine your feedback skills. To get started, please choose the model you'd like to practice today: SBI (for clear, non-judgmental feedback) STAR (for behavioral reinforcement) DESC (for resolving conflict) Pendleton (for a collaborative coaching dialogue)"
Which model will we practice with?
|